
Now I've noticed that Dick Eastman has had a couple posts about negative/slide scanners recently. That's not why I decided to do this post. I actually am reviewing this because my friend Jen of Climbing My Family Tree had talked about these types of scanners and wanting one. I gave her my quick 2 cents and promised a review when time allowed. It does so here goes...
A year or so ago I finally got my negatives into archival sleeves and in binders (labeled by location of course!) and thought it was time to sit down and start scanning them. Sadly, I believed that my all-in-one printer could do this and found out quickly that I was mistaken. The printers I looked into that could handle negatives and slides were way more than I wanted to pay. I started searching online and came across a number of them on Amazon.com. What I saw were negative/slide converters that were either several hundred dollars or less than $100. Nothing really in between. I went with the FilmScan 35 I by Innovative Technology. Most of the complaints at the time had to do with it taking so long rather than the quality and effectiveness of the converter itself, so I decided to give it a go.
I must start by saying that my laptop had been running Windows Vista. The converter was compatible with Vista, but is anything really compatible with Vista? The converter didn't work right off the bat and I had to reintall the software a few times before I got it running, but it would crash. Sometimes it would work for one picture and sometimes it would work for an hour or more, but inevitably it would crash and burn. I tried everything, removing the USB plug and putting it in another port, reinstalling the software/drivers/etc, closing it down and walking away, yelling at it, voodoo, etc. Nothing worked. I could never tell if I was going to have a good day with it or a bad day.
I put it away for quite some time and decided that today was the day I was going to bring it out and see how it ran on Windows 7. My laptop is no longer recognizing it's disk drive (time for the hubby to get friendly with my computer again) so I installed the converter on one of his laptops. It took a little bit of time (not knowing whether to do the x82/32-bit or x64/64-bit installation, I apparently chose the wrong one and it failed to work until I did the 64-bit installation) and a lot of swearing, but I got it to work. No crashes. It didn't freeze and it worked beautifully. Well, as beautifully as a $65 converter can be expected to work.
So, how did it work? That really depends on your negatives. Some of mine were getting quite discolored. This scanner will do the job of converting them when you get it working, but it's not going to fix your negatives. You need photo editing software for that and be warned this converter comes with no photo editing software. But what do you expect for $65?
The converter isn't super fast, but it's not awful. You've got to wait a few seconds for the negative to adjust. Once the image stops making subtle changes you can push the copy button on the top of the converter and capture the image.
 |
| Image immediately after inserting |
 |
| Image after converter has stopped adjusting |
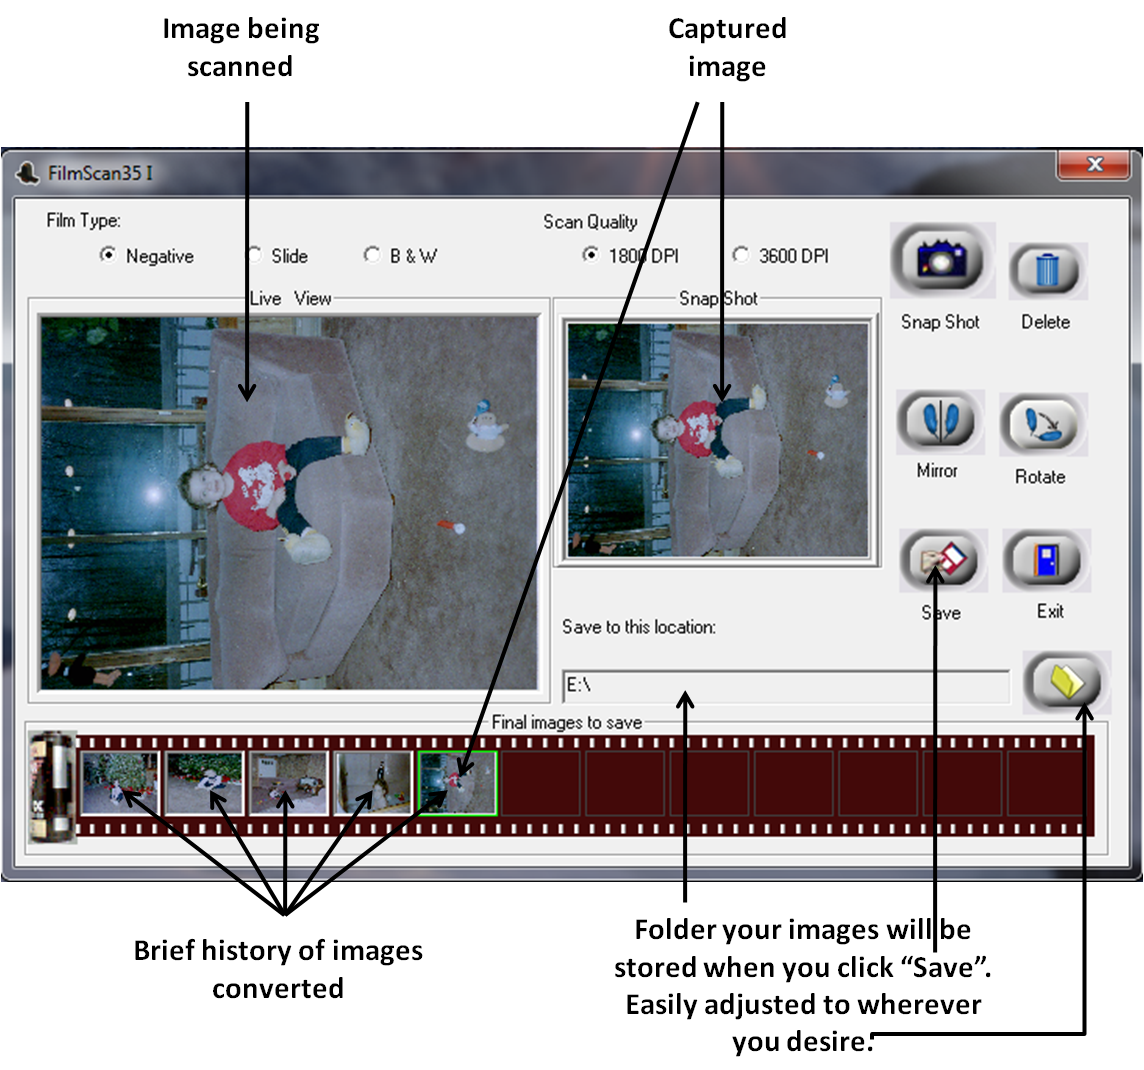
As you can see from the picture above, the program really isn't that complex. You won't get lost using it, which is good, because the instruction booklet that came with the converter was 2x3-inches and 6 pages long. I'm not joking...it was a tiny thing. There is a quick-start guide and an instruction manual on the disk that comes with the converter, but it doesn't get extremely detailed. It could be better.
Now as for customer support. There was NO contact information with the packaging or in the instructions booklets. I had to go searching for a way to contact Innovative Technology online when I was having problems with the converter back in May 2009. I emailed twice in a 6 week period and got the computer-generated response that my email was important to them and that I would be contacted shortly. Well, that never happened. In my 2nd email I even told them that I was preparing to review their product on Amazon.com and would appreciate a response so I could give a better review. Nothing.
I've seen more current reviews saying how brilliant customer service was. Maybe they fixed their customer service issues. Bottom line...the converter is on the slow side, but it works and it's cheap. It's cheaper than paying someone to do it for you, but you'll be investing a lot of time in the conversion process. I think it's worth it in the end. I gave it 3-stars when I rated in a year ago. With Windows 7, I'll bump that up to 4-stars. Now I just have to get smart on my photo editing software so I can fix the colors!
